
 Русский
 العربية
 Français
 Türkçe
 Română
 Português
 ქართული
 български
 Magyar
Suspended ceilings, also known as drop ceilings or false ceilings, have become a popular choice in modern interior design for their functionality and aesthetic appeal. Whether you’re renovating your home, office, or commercial space, fixing a suspended ceiling can elevate the ambiance while concealing unsightly structural elements and utilities. While hiring a professional can be an option, a well-executed DIY approach can save costs and provide a sense of accomplishment. This article serves as a comprehensive DIY guide for fixing suspended ceilings, providing step-by-step instructions to achieve polished and functional results.
1. Assessing the Space and Requirements
Before diving into the fixing process, assess the space and identify the specific requirements for the suspended ceiling. Consider factors such as the room’s dimensions, lighting needs, and the existing ceiling structure. Evaluate whether you need to access utilities like electrical wires or HVAC ducts hidden within the space between the suspended ceiling and the primary ceiling.
2. Choosing the Right Materials
Selecting the appropriate materials is crucial for a successful suspended ceiling project. There are various components involved, including ceiling tiles, suspension systems, and perimeter moldings. Choose high-quality materials that align with your design preferences and budget. Ceiling tiles come in different materials such as mineral fiber, fiberglass, and metal, each offering unique properties and aesthetics.
3. Preparing the Workspace
Before commencing the installation, prepare the workspace by clearing the area below the existing ceiling. Cover furniture and belongings with protective sheets to avoid any potential damage during the fixing process. Additionally, ensure you have all the necessary tools, such as a tape measure, level, drill, screws, and a utility knife, to facilitate a smooth installation.
4. Removing the Old Ceiling (If Required)
If you are replacing an existing ceiling, begin by removing the old materials. This step is essential for safety reasons and to create a clean slate for the new suspended ceiling. Carefully detach ceiling tiles or panels, taking note of any wiring or plumbing that may need to be rerouted or repaired.
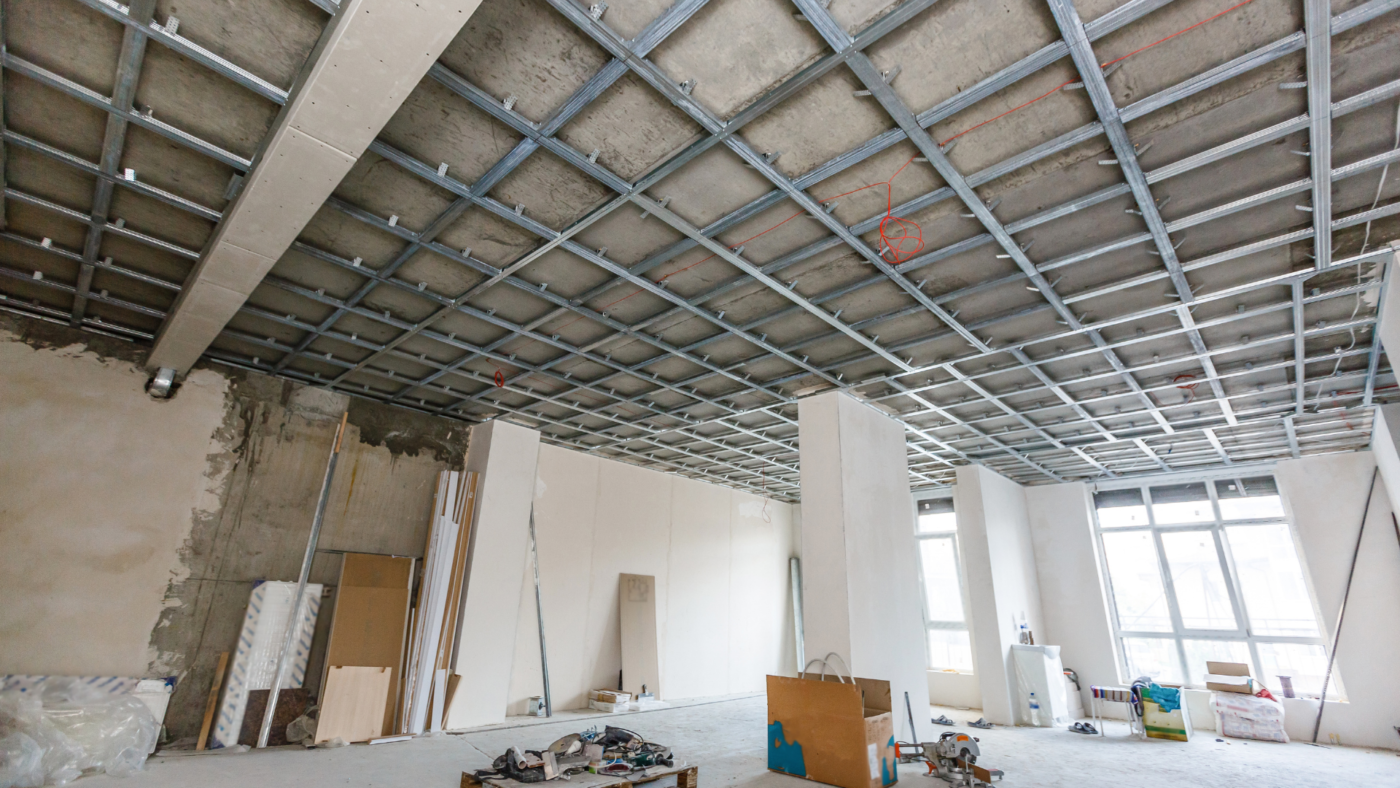
5. Installing the Suspension System
The suspension system is the framework that supports the suspended ceiling. It typically consists of main runners and cross tees that form a grid pattern. Start by installing the main runners along the length of the room, ensuring they are level and securely attached to the existing ceiling or the wall. Then, insert the cross tees to create the grid structure, keeping them evenly spaced and perpendicular to the main runners.
6. Placing the Ceiling Tiles
With the suspension system in place, it’s time to install the ceiling tiles. Begin at one corner of the room and work your way across the grid. Carefully insert each tile into its designated grid space, ensuring a snug fit and alignment with adjacent tiles. If necessary, cut tiles to fit around corners, light fixtures, or vents using a utility knife.
7. Adding Perimeter Moldings
To achieve a polished and finished look, install perimeter moldings around the edges of the suspended ceiling. Perimeter moldings provide a clean transition between the suspended ceiling and the walls, concealing any gaps and rough edges. Attach the moldings securely to the wall using appropriate fasteners, ensuring they align with the grid layout for a seamless appearance.
8. Integrating Lighting and Utilities
Depending on your design and lighting preferences, you may wish to incorporate lighting fixtures into the suspended ceiling. Recessed lights or LED panel lights are popular choices as they seamlessly blend into the ceiling grid, providing even and efficient illumination. When integrating lighting fixtures, follow safety guidelines, and ensure proper wiring and connections to avoid any electrical hazards.
9. Adding Finishing Touches
Once the main installation is complete, inspect the suspended ceiling for any gaps, loose tiles, or imperfections. Make necessary adjustments and secure any loose tiles to ensure a polished and consistent appearance. Clean the tiles and moldings to remove any dust or debris, leaving your new suspended ceiling looking fresh and immaculate.
10. Final Inspection and Enjoyment
Before celebrating the completion of your suspended ceiling project, conduct a final inspection to ensure everything is in place and functioning as intended. Check for any potential issues, such as uneven tiles or wiring concerns. Once satisfied with the results, take a moment to appreciate your efforts and enjoy the transformation of your space with the new suspended ceiling.
Fixing a suspended ceiling can be a rewarding and gratifying DIY project, transforming a space with enhanced aesthetics and functionality. By assessing the requirements, choosing the right materials, and meticulously following the installation steps, you can achieve polished and functional results that elevate the ambiance of any room. Whether you’re creating a modern office space, a cozy living room, or a welcoming commercial setting, mastering the art of fixing suspended ceilings allows you to create a visually appealing and well-designed environment with confidence. Embrace the creativity and satisfaction of a successful DIY suspended ceiling project that truly reflects your personal style and vision.
How To Fix a Sagging Suspended Ceiling
A sagging suspended ceiling can be a cause for concern, compromising both safety and aesthetics in a room. Whether due to moisture, aging materials, or improper installation, addressing this issue promptly is essential. This comprehensive guide provides step-by-step instructions on how to fix a sagging suspended ceiling, ensuring structural integrity and restoring the room’s visual appeal.
1. Identify the Cause of Sagging
Before initiating any repairs, it’s vital to identify the root cause of the sagging. Inspect the suspended ceiling thoroughly to determine if there are signs of water damage, excessive weight, or structural issues. Understanding the underlying problem will help you implement the appropriate solution.
2. Clear the Area and Ensure Safety
Ensure the safety of both yourself and others in the area by clearing the space below the sagging portion of the suspended ceiling. Relocate furniture and belongings to avoid any potential hazards during the repair process.
3. Locate the Affected Area
Identify the specific area of the sagging suspended ceiling. Carefully examine the ceiling tiles, main runners, cross tees, and suspension system to pinpoint the exact location of the sag.
4. Reinforce the Support Structure
To address the sagging, focus on reinforcing the support structure of the suspended ceiling. Start by examining the main runners and cross tees to ensure they are securely attached and level. Tighten any loose connections or replace damaged parts as needed. Consider adding additional hangers or supports to bear the weight evenly.
5. Replace Damaged or Wet Ceiling Tiles
If moisture is the cause of the sagging, inspect the ceiling tiles for signs of water damage. Replace any damaged tiles to prevent further sagging and maintain the overall integrity of the suspended ceiling.
6. Install Temporary Supports
For severe sagging, temporary supports may be necessary to stabilize the suspended ceiling during the repair process. Use adjustable braces or props to provide additional support until the sag is corrected.
7. Lift and Secure the Sagging Area
With the temporary supports in place, carefully lift the sagging area of the suspended ceiling back into its original position. Use a level to ensure that the tiles and suspension system are aligned properly. Secure the area by reattaching any loose tiles, runners, or tees.
8. Address Moisture Issues
If moisture is the cause of the sagging, it’s crucial to identify and address the source of the water intrusion. Repair leaks or condensation issues to prevent future damage and sagging.
9. Reinforce with Additional Supports
For added stability, consider reinforcing the sagged area with additional supports, such as brackets or braces. These supports can provide extra strength to ensure the suspended ceiling remains level and secure.
10. Conduct a Thorough Inspection
After completing the repairs, conduct a thorough inspection of the entire suspended ceiling to ensure all issues are addressed. Check for any other areas of concern and make any necessary adjustments to ensure the structural integrity of the entire ceiling.
11. Final Clean-Up and Restoration
Once you are satisfied with the repairs and stability of the suspended ceiling, clean the tiles and surrounding area to remove any dust or debris. Restore the room to its original condition, returning furniture and belongings to their rightful places.
12. Regular Maintenance and Prevention
To prevent future sagging and maintain the suspended ceiling’s longevity, conduct regular maintenance checks. Inspect for signs of water damage, loose connections, or other potential issues. Addressing any minor concerns promptly can help avoid larger problems later on.
Fixing a sagging suspended ceiling is crucial for both safety and aesthetics. By identifying the cause of the sag, reinforcing the support structure, and making necessary repairs, you can restore the ceiling’s stability and appearance. Regular maintenance and timely interventions are key to preventing future sagging and ensuring the suspended ceiling remains a functional and visually appealing component of the room.